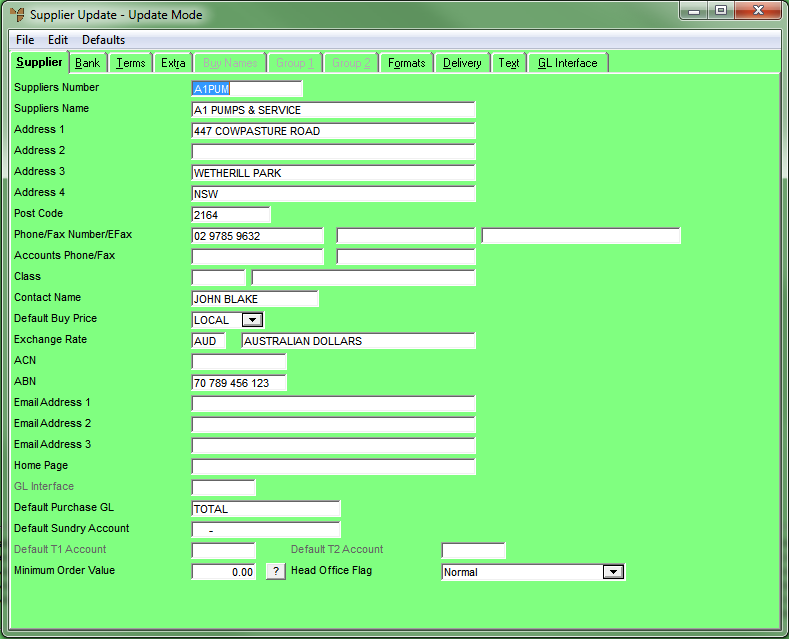
Use this tab to add or edit basic supplier details such as the supplier's name and contact details.
Refer to "Adding a New Supplier" or "Updating a Supplier".
|
|
Field |
Value |
|---|---|---|
|
|
Suppliers Number |
Micronet displays the supplier number for existing suppliers. If you are creating a new supplier and Micronet has been setup to generate automatic supplier numbers, this field displays AUTO and the next available supplier number displays next to the Take Next Number button. Select the Take Next Number button to take the next number for this supplier. (Automatic supplier numbers are set in the Use Automatic Supplier Number field on the Purchasing Configuration screen. For more information, refer to "Edit - Program - Purchasing".) If Micronet is not setup for automatic supplier numbers, enter a unique number for new suppliers based on your company's supplier numbering conventions. The supplier number can be alphanumeric, e.g. ABC001 where ABC are the first three alpha characters of the supplier name and 001 are the next three available numbers for a supplier with those alpha characters. |
|
|
Suppliers Name |
Micronet displays the company name for existing suppliers. For new suppliers, enter the full company name. This name will appear on cheques and remittance advices to the supplier. Additional unlimited text can also be entered against a supplier on the Supplier Update screen - Text tab – see "File - Supplier - Text". |
|
|
|
Technical Tip There is a handy feature you can use when you want users to replace the current supplier with a different one. If you type the word "Use" at the start of the supplier name followed by another supplier number, Micronet will replace the current supplier with the second one whenever a user enters the current supplier number. For example, if you change a supplier name from "XYZ" to "Use UVW", whenever a user enters XYZ when searching for a supplier, Micronet will replace it with supplier UVW. |
|
|
Address 1, 2, 3, 4 |
Enter the supplier’s address details. You may adopt a convention where:
|
|
|
Post Code |
Enter the supplier’s postcode. |
|
|
Phone/Fax Number/Efax |
Enter the supplier’s phone number and/or fax number. 2.8 Feature If your company has a UTBox account, and this supplier wants to receive their purchase orders by fax, enter the supplier’s fax number. You must add "@fax.utbox.net" after the fax number, e.g. 61295422100@fax.utbox.net. For information on setting up a UTBox account, contact your Micronet account manager. |
|
|
Accounts Phone/Fax |
Enter the supplier’s Accounts department’s phone number and/or fax number. |
|
Class |
Select the supplier’s class, if applicable. This is an optional field for sorting and reporting on suppliers. Your classes must already be setup (refer to "File - Class"). |
|
|
Contact Name |
Enter the name of the supplier’s contact. |
|
|
Default Buy Price |
Select a default buy price for the supplier. Options are Buy Price 1-8, Nett, Average Cost or Last Cost. For multi-currency transactions, select a foreign buy price for purchasing transactions. |
|
|
Exchange Rate |
For multi-currency transactions, enter the supplier’s exchange rate code, e.g. USA for US dollars. Press spacebar then Enter to select an exchange rate code. This field is only enabled if the Multi-Currency Creditors field on the MCL General Configuration screen is set to Yes. Refer to "Edit - Applications - MCL". Exchange rates must already be setup (refer to "File - Exchange Rates"). |
|
|
ACN |
Enter the supplier’s Australian Company Number. For multi-currency transactions, enter IMPORT. Micronet does not calculate GST on these supplier transactions. |
|
|
ABN |
Enter the supplier’s Australian Business Number. If you don’t enter an ABN, when making payments Micronet prompts you to withdraw 48.5% as a Withholding Tax amount. If you don’t know the supplier’s ABN, enter TBA to stop Micronet from applying Withholding Tax. For overseas (multi-currency) suppliers, enter IMPORT so Micronet does not calculate GST on the supplier transactions. |
|
|

|
Technical Tip Setting the ABN to IMPORT is also useful for suppliers under the GST report threshold. |
|
Email Address 1, 2, 3 |
Enter up to three email addresses for the supplier, e.g. the email address of their main contact plus one for their Accounts department. This field can be used when setting up creditor remittance advices – EFT so that advices are emailed to the nominated email address. |
|
|
Home Page |
Enter the URL for the supplier’s Internet home page (for information purposes). |
|
|
|
GL Interface |
If you are using the Micronet General Ledger system (MGL) and you want to dissect receipts by supplier, enter the name of the GL interface record for this supplier. This is usually set to TOTAL. If you leave this field blank, an interface record has to be selected when entering creditor payments. When entering creditor invoices, the trade creditors, GST input credits, and withholding tax accounts need to be entered for each payment. For more information on setting up GL interface records, refer to "Setting up Micronet Integration". |
|
|
Default Purchase GL |
Enter the name of the default GL interface record for purchases from this supplier. You can also press spacebar then Enter to select a GL interface. This interface defaults when completing goods receipts or import costing. |
|
|
Default Sundry Account |
Enter the default sundry GL account. This account defaults when purchasing or receiving sundry orders (refer to "Inventory – Purchase Order Creation" and "Inventory - Goods Received"). |
|
|
Default T1 Account |
If you are using T accounting within MGL, enter the default T1 account for this supplier. You can also press spacebar then Enter to select a T1 account. |
|
|
Default T2 Account |
If you are using T accounting within MGL, enter the default T2 account for this supplier. You can also press spacebar then Enter to select a T2 account. |
|
|
|
Technical Tip You can set different default GL interface records and T accounts for this supplier for different warehouses on the Supplier Update screen - GL Interface tab. For more information, refer to "File - Supplier - GL Interface (v2.8)". (2.8 feature) |
|
|
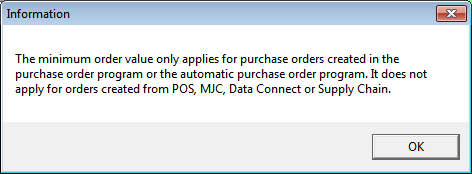
Minimum Order Value |
Enter the minimum order value for this supplier. If a purchase order is created for an amount less than this value, Micronet displays a message to the user stating that the value is less than the minimum purchase order value for this supplier and asking if they want to continue. 2.8 Feature Enter the minimum order value for this supplier. How Micronet treats this value depends on the setting in the Prevent P/O below minimum order value on the Purchasing Configuration screen in your company settings – refer to "Edit - Program - Purchasing". If that field is set to:
Selecting the ? button displays the following information message:
|
|
|
Head Office flag |
If inter-company trading has been setup for this supplier, select the branch type. Options are:
For more information about inter-company trading, refer to "Edit - Program - Inter Branch Transfer". |
For more information, refer to "Supplier Update Screen - Menu Options".